Abstract:
Booting an operating system has always been considered a challenging task. In this document we will take a look at the different aspects of the boot process. Such as the BIOS which is the first code which runs, the boot loaders that can load different operating systems, pass arguments to the kernel, load it from different sources like a hard drive, a flash, and network & finally the kernel itself. Though loading the kernel & setting it up to execute is not all that is to be done, we need to bring the system up with different user specific configurations. We will look at the scripts, which deal with this.
Linux has grown from a system that used to boot from a floppy providing no luxurious features to the user, to the current jazzy Linux systems. It is important to have an insight of the Linux boot procedure. Say for Linux to serve the purpose on embedded systems, the generic boot procedure must almost always be modified to meet the needs of the target application.
Introduction:
The moment after a computer is powered on, the systems memory is empty, the processor has no clue as to where it is & what it is supposed to execute. To see us through this situation a special hardware circuit raises the logical value of the RESET pin of the CPU. After RESET is thus asserted, some registers of the processor are set to fixed values, and the code found at physical address 0xFFFF FFF0, which is system BIOS, is executed. The BIOS does the POST ,some initialization & loads the boot sector from the boot device. The code that sits in the MBR is the boot loader; it gives us the ability to load multiple operating systems. The next in this process is the kernel itself, but its not as straight as it looks there are a few critical steps, which we will see in details a bit later. After the kernel is up and running it needs to mount the root file system. Say if the file system driver compiled as module then we won’t be able to directly mount the real root file system. To get over this we use an initrd images, which has the modules & a “linuxrc “ which can be a script or a binary. This will mount the real root file system & run init process. The init process reads the scripts & starts all the services according to the configuration. This is the final step in the boot process, now our system is all set to go..
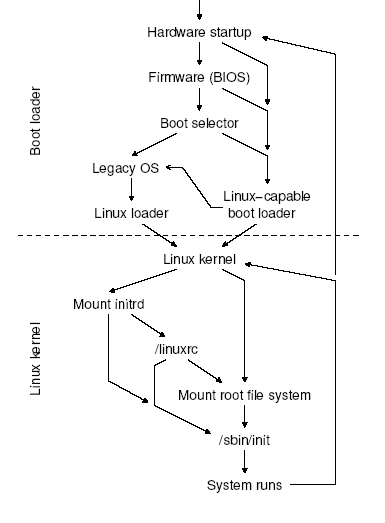
Linux boot flow
Basic Input Output System [BIOS]
The address [0xFFFFFFF0] is mapped by the hardware to some read-only, persistent memory chip[ROM/FLASH]. The set of programs stored in ROM is traditionally called BIOS (Basic Input/Output System), since it includes several interrupt-driven low-level procedures used by some operating systems, including Microsoft’s MS-DOS, to handle the hardware devices that make up the computer. Once initialized, Linux does not make any use of BIOS but provides its own device driver for every hardware device on the computer.
The BIOS plays an important role in system boot up process.
1. Executes a series of tests on the computer hardware, in order to establish which devices are present and whether they are working properly. This phase is often called POST (Power-On Self-Test). During this phase, several messages, such as the BIOS version banner, are displayed.
2. Initializes the hardware devices. This phase is crucial in modern PCI-based
architectures, since it guarantees that all hardware devices operate without conflicts on the IRQ lines and I/O ports. At the end of this phase, a table of installed PCI devices is displayed.
3. Searches for an operating system to boot. Actually, depending on the BIOS setting, the procedure may try to access (in a predefined, customizable order) the first sector (boot sector) of any floppy disk, any hard disk, and any CD-ROM in the system.
4. As soon as a valid device is found, copies the contents of its first sector into RAM, starting from physical address 0×7c00, then jumps into that address and executes the code just loaded.
Master Boot Record:
Just as a CPU needs a predefined starting point of execution, every hard disk must have a consistent starting point where key information about the disk is stored. Such as how many partitions it has, what kind of partitions they are, etc. There also needs to be somewhere that the BIOS can load the initial boot program that starts the process of loading the operating system. The place where this information is stored is called the master boot record (MBR). It is also sometimes called the master boot sector or even just the boot sector.
The master boot record is always located at cylinder 0, head 0, and sector 1, the first sector on the disk. This is the consistent “starting point” that the disk always uses. When the BIOS boots the machine, it will look here for instructions and information on how to boot the disk and load the operating system. The master boot record contains the following structures:
Partition Table: This small table contains the descriptions of the partitions that are contained on the hard disk. There is only room in the partition table for the information describing four partitions. Therefore, a hard disk can have only four true partitions, also called primary partitions. Any additional partitions are logical partitions that are linked to one of the primary partitions.
Master Boot Code: The master boot record contains the small initial boot program that the BIOS loads and executes to start the boot process. This program eventually transfers control to the boot program stored on whichever partition is used for booting the PC.
Volume Boot Sector:
Each partition has its own volume boot sector. This is distinct from the master boot sector that controls the entire disk, but is similar in concept. It is also sometimes called the volume boot record or partition boot sector. Each volume boot sector contains
Disk Parameter Block: Also sometimes called the media parameter block, this is a data table that contains specific information about the volume, such as its specifications (size, number of sectors it contains, etc.), label name, and number of sectors per cluster used on the partition.
Volume Boot Code: This is code that is specific to the operating system that is using this volume and is used to start the load of the operating system. This code is called by the master boot code that is stored in the master boot record, but only for the primary partition that is set as active For other partitions, this code sits unused.
Boot Loaders:
A Boot Loader comes after the BIOS. It is the code, which sits in the MBR & is responsible for loading and transferring control to an operating system kernel. It allows you to load multiple operating systems, or different kernels for the same OS. You may need to tell the kernel to start in some special configuration, this is especially important when trying to fix a system that has a problem that prevents a full boot. To fix such a problem, you may need single-user mode or an alternate kernel.The boot loader loads a kernel image into memory, supplying it with some parameters. These parameters are simple text strings like -s for booting in single-user mode and root=partition for using partition as the root filesystem instead of the default.You can specify a runlevel number as a parameter to make the system boot into a runlevel other than the default.
The boot loader loads the first sector of the partition marked as active into RAM .The size of the MBR is limited to one sector on disk or 512 bytes, since it is located within the first sector of the drive at cylinder 0, head 0, sector 1. This size limitation greatly limits its functionality. Typically boot loaders have been highly integrated with the operating system that they support. This integration cuts down on the operations a boot loader must perform, making a 512 byte boot loader feasible. When more functionality is required, a multi-stage boot loader m~ be used.A multi-stage boot loader provides more function and flexibility by working around the 512 byte size limitation. Rather than consisting of a single program which loads the operating system directly, multi-stage boot loaders divide their functionality into a number of smaller programs that each successively load one another. This architecture allows a fairly primitive boot loader, located in the MBR, to load and execute the next stage of the boot loader, a larger and more sophisticated boot loader.Subsequent stages can be located elsewhere on the hard drive and thus are not subject to the single sector size limit. This chaining of boot loaders allows the boot loader functionality to become arbitrarily
compIex. LILO and GRUB are two well-known multi-stage boot loaders capable of booting a
nmnber of operating systems including Linux, Windows and FreeBSD.
Booting the Kernel Image
Booting an x86 kernel is a tricky task because of the limited amount of available
memory .The x86 real mode puts a 1Mb limit on the maximum memory address ,as we have only 20 bits in this mode.In earlier days ,we were living happiliy with this,when the kernel images used to be in few Kbs.Now a days the kernel size is gon the range of Mbs so we had to find a way out of it.The setup function either switches to protected mode so that it can access the whole memory,or uses special BIOS routines to copy the kernel image in the address range above 1Mb.This may put one more limit i.e. 16Mb as some older versions of BIOS [i286 based]cant report more than 16Mb.for some bioses this range is 64Mb.

Memory layout
We can have different types of kernel images like an uncompressed image vmlinux compressed ones like zImage & bzImage .The linux boot procedure differs slightly depending upon which kernel image you are using. Let’s look at the steps performed by for different kernels in detail.
The first sector (executing at 0×7c00) moves itself to 0×90000 and loads subsequent sectors after itself, getting them from the boot device using the firmware’s functions to access the disk. The rest of the kernel is then loaded to address 0×10000, allowing for a maximum size of half a megabyte of data.
1>Uncompressed image:
Then code at 0×90200 (defined in setup.S) takes care of some hardware initialization and allows the default text mode (video.S) to be changed.
Later, all the kernel is moved from 0×10000 (64K) to 0×1000 (4K). This move overwrites BIOS data stored in RAM, so BIOS calls can no longer be performed. We don’t care because linux dosen’t use BIOS to acces the hardware,. The first physical page is not touched because it is the so-called “zero-page”, used in handling virtual memory.
At this point, setup.S enters protected mode and jumps to 0×1000, where the kernel lives. All the available memory can be accessed now, and the system can begin to run.
The steps just described were once the whole story of booting when the kernel was small enough to fit in half a megabyte of memory–the address range between 0×10000 and 0×90000. As features were added to the system, the kernel became larger than half a megabyte and could no longer be moved to 0×1000. Thus, code at 0×1000 is no longer the Linux kernel, instead the “gunzip” part of the gzip program resides at that address. The following additional steps are now needed to uncompress the kernel and execute it:
2>Compressed Image [zImage]
When the kernel is moved to 0×1000 (4K) ,head.S in the compressed directory is sitting at this address.Its in charge of gunzipping the kernel,this done by a function decompress_kernel(), defined in compressed/misc.c, which in turns calls inflate which writes its output starting at address 0×100000 (1MB). High memory can now be accessed, because setup.S han take us to the protected mode now.
After decompression, head.S jumps to the actual beginning of the kernel. The relevant code is in ../kernel/head.S.
head.S (i.e., the code found at 0×100000 ) can complete processor initialization and call start_kernel().
The boot steps shown above rely on the assumption that the compressed kernel can fit in half a megabyte of space. While this is true most of the time, a system stuffed with device drivers might not fit into this space. For example, kernels used in installation disks can easily outgrow the available space. To solve this problem problem bzImage kernel images were introduced.
3>Big Compressed Image [bzImage]
This kind of kernel image boots similarly to zImage, with a few changes.
When the system is loaded at 0×10000(64K) a special helper routine is called which does some special BIOS calls to move the kernel to 0×100000(1Mb)
setup.S doesn’t move the system back to 0×1000 (4K) but, after entering protected mode, jumps instead directly to address 0×100000 (1MB) where data has been moved by the BIOS in the previous step.
The decompresser found at 1MB writes the uncompressed kernel image into low memory until it is exhausted, and then into high memory after the compressed image.
The two pieces are then reassembled to the address 0×100000 (1MB). Several memory moves are needed to perform the task correctly.
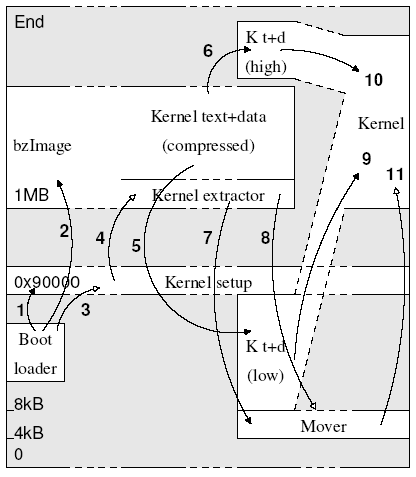
Movements of data and control
Note:: Steps 1,2,5,6,7,9,10 which are indicated by pointers with solid heads are data movements
Whereas 3,4,8,11 are directing the execution flow.
Setup.S
[/arch/i386/boot/setup.S ]
setup.s is responsible for getting the system data from the BIOS, and putting them into the appropriate places in system memory. This code asks the bios for memory/disk/other parameters, and puts them in a “safe” place: 0×90000-0×901FF.It is then up to the protected mode system to read them from there before the area is overwritten for buffer-blocks. It reinitializes all hardware, since Linux does not rely on the BIOS to do this properly, switches from real mode to protected mode memory addressing, sets up a provisional GDT and a provisional IDT, reprograms the Programmable Interrupt Controller (PIC), re-maps the 16 IRQ lines from 0 thru 15.
Lets look at the code flow & the step executed in finer details.
1.We will start executing at 0×9200,the first instruction found is a jump to the label trampoline, as what follows next is a block of initializers. At trampoline we call a procedure “start_of_setup”,this where the actual work starts.
2.Reset the disk controller
1.Setup the code & data segment registers to SETUPSEG i.e. 0×9020
2.It looks for the two signatures [SIG1 0xAA55,SIG2 0x5A5A] at the end of setup block to ensure that the loader (LILO) loaded us right.
3.If the signature is missing we have to find the rest of the setup code. If we are unable to get the code we will give up throwing a message “No setup signature found …” at put the processor in halt state.
4.Change the data segment register to INITSEG 0×9000
5.Check if the loader version is proper, just to ensure that the loader can deal with the high loaded kernel. Jump to ‘loader_ok’ if a proper loader version else Strike a message “Wrong loader, giving up…” .
6.Get the extended memory size in Kb that can be found at the offset 0×1E0.If different memory detection scheme is used then try these three.First, try e820h, which lets us assemble a memory map, then try e801h, which returns a 32-bit memory size, and finally 88h, which returns 0-64m
7.Set the keyboard repeat rate to the max
8.Check for video adapter and its parameters and allow the user to browse video modes. This done by calling video which is there in video.S
9.Get hd0 data,check if hd1 is there ,scan for MCA bus.
10.Check if Voyager is enabled .
11.configure Ps/2 pointing device.
12.Check for APM bios,record the BIOS version.Check for 32 bit APM BIOS support.
13.After this the code from edd.S is executed.EDD stands for Enhanced Disk Drive support.
14.Now we want to move to protected mode. If there is a valid pointer to a real mode switch routine at offset “realmode_switch” then call that ,else leave it to the “default_switch”.
The default_switch routine disables interrupts [cli] & NMI.
15.Now we move the system to its rightful place … but we check if we have a big-kernel. In that case we must not move it …we get the “code32_start” address & modify
“code32 “ which is [0x1000 4K] for default for zImage or [0x100000 1Mb] for big kernel,as it can be changed by the loader.
16.Now we will set up the GDT and IDT.
17.make sure any possible coprocessor is properly reset.
18.Now we mask all interrupts – the rest is done in init_IRQ() ,called from start_kernel() & mask all IRQs but IRQ2 which is cascaded.
19.This the time when we actually jump into the protected mode by setting the PE bit.
[Movw $1, %ax & lmsw %ax]
20.The last line executed in this file is a jump to an assembly function called “startup_32”, which performs additional initialization. There are actually two “startup_32” assembly functions in the Linux kernel, located at/arch/i386/boot/compressed/head.S and /arch/i386/kernel/headS. The reason that these duplicate names do not cause any naming conflicts is because each function is reached by jumping to a physical address, rather than via a call to a label. The existence of both versions is an artifact of when there was a single head.S file, before compression was implemented for the kernel image. At the end of the initial assembly code in /arch/i386/boot/setup.S a jump to offset 0xl00000 in segment KERNEL_CS is called. This is where the version of startup_320 found in Head.S [ /arch/i386/boot/compressed/head.S ].But the jump a little tricky, as we haven’t yet reloaded the CS register, the default size of the target offset still is 16 bit. However, using an operand prefix (0×66), the CPU will properly take our 48 bit far pointer. [.byte 0x66, 0xea].
Head.S [/arch/i386/boot/compressed/head.S ]
It performs the following operations:
1.Initializes the segmentation registers
2.Sets up a provisional stack
3.Decompresses the kernel image [decompress_kernel() misc.c]
4.“decompress_kernel” returns a value telling whether we were loaded high or not. If not we straight away jump to startup_32 function in the decompressed kernel, in /arch/i386/kernel/head.S [0x100000],else we move the “move_in_place” routine to address 0×1000 [4K].This will move the kernel to its final destination [0x100000].
Head.S [/arch/i386/kernel/head.S ]
The second startup_32() continues the initialization sequence. its main job is to set up an environment within which the first process can execute. This includes:
1. Initializes the segmentation registers with their final values.
2. Sets up the Kernel Mode stack for Process 0.
3. Initializes the provisional kernel Page Tables & create a PDE
4. Stores the address of the Page Global Directory in the cr3 register, and enables paging by setting the PG bit in the cr0 register.
5. Fills the bss segment of the kernel with zeros.
6. Invokes setup_idtO to fill the IDT with null interrupt handlers.
7. The first page frame is loaded with the system parameters learned from the BIOS and the
parameters passed to the operating system from the boot loader.
8. Loads the gdtr and idtr registers with the addresses of the GDT and IDT tables.
9. The first CPU calls “start_kernel” which does the rest of initialization, all other CPUs call “initialize_secondary”
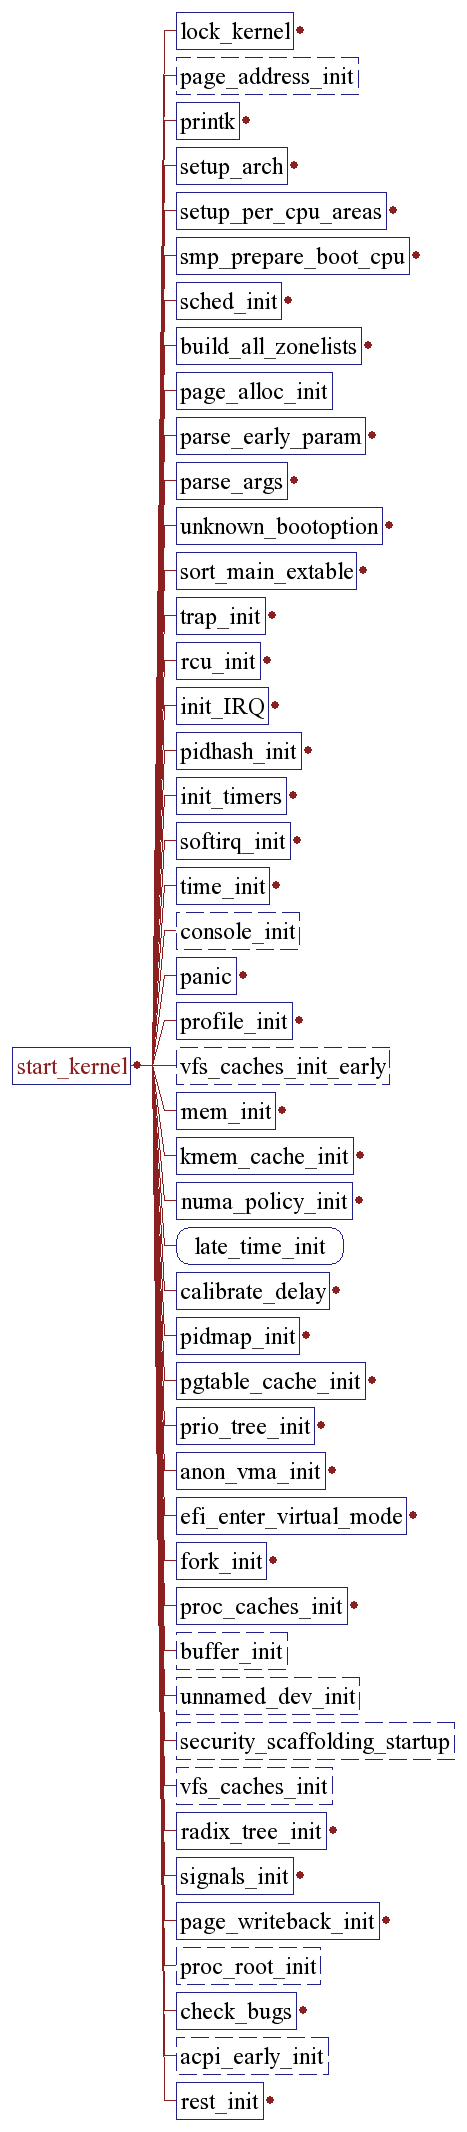
Start_kernel();
[/init/main.c.]
The start_kernel is the first function written in C. It performs the following tasks.
1.Take a global kernel lock (it is needed so that only one CPU goes through initialisation).
2.Perform arch-specific setup (memory layout analysis, copying boot command line again, etc.).
3.Print Linux kernel “banner” containing the version, compiler used to build it etc. to the kernel ring buffer for messages. This is taken from the variable linux_banner defined in init/version.c and is the same string as displayed by cat /proc/version.
4.Initialise traps.
5.Initialise irqs.
6.Initialise data required for scheduler.
7.Initialise time keeping data.
8.Initialise softirq subsystem.
9.Parse boot commandline options.
10.Initialise console.
11.If module support was compiled into the kernel, initialise dynamical module loading facility.
12.If “profile=” command line was supplied, initialise profiling buffers.
13.kmem_cache_init(), initialise most of slab allocator.
14.Enable interrupts.
15.Calculate BogoMips value for this CPU.
16.Call mem_init() which calculates max_mapnr, totalram_pages and high_memory and prints out the “Memory: …” line.
17.kmem_cache_sizes_init(), finish slab allocator initialisation.
18.Initialise data structures used by procfs.
19.fork_init(), create uid_cache, initialise max_threads based on the amount of memory available and configure RLIMIT_NPROC for init_task to be max_threads/2.
20.Create various slab caches needed for VFS, VM, buffer cache, etc.
21.If System V IPC support is compiled in, initialise the IPC subsystem. Note that for System V shm, this includes mounting an internal (in-kernel) instance of shmfs filesystem.
22.If quota support is compiled into the kernel, create and initialise a special slab cache for it.
23.Perform arch-specific “check for bugs” and, whenever possible, activate workaround for processor/bus/etc bugs. Comparing various architectures reveals that “ia64 has no bugs” and “ia32 has quite a few bugs”, good example is “f00f bug” which is only checked if kernel is compiled for less than 686 and worked around accordingly.
24.Set a flag to indicate that a schedule should be invoked at “next opportunity” and create a kernel thread init() which execs execute_command if supplied via “init=” boot parameter, or tries to exec /sbin/init, /etc/init, /bin/init, /bin/sh in this order; if all these fail, panic with “suggestion” to use “init=” parameter.
25.Go into the idle loop, this is an idle thread with pid=0.
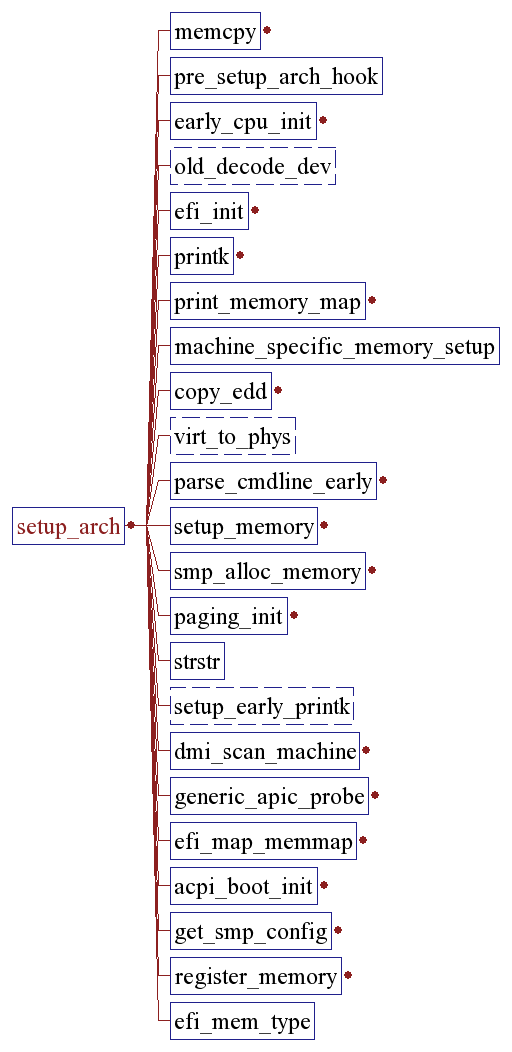
setup_arch(): [arch/i386/kernel/setup.c]
The setup_arch() function is responsible for initial, machine-specific initialization procedures. These include setting up the machine vector for the host, and determining the locations and sizes of available memory. Setup_arch() also initializes a basic memory allocator called bootmem to use during the boot process, and for most processors, calls paging_init() to enable the host’s Memory Management Unit (MMU). The host’s machine vector is a data structure containing the name of the host, and function pointers for host-specific functions to read and write i/o ports. The machine vector reduces the number of configuration points in the kernel, by allowing host-specific operations in generic kernel code to use a common API.
sched_init() [kernel/sched.c.]
Sched_init() initializes the kernel’s pidhash[] table, a lookup table for quickly mapping process
IDs to process descriptors used by the kernel. The sched_init() function then initializes the vectors
and bottom-half handlers used by the kernel’s various internal timers.It marks the current thread as idle thread, so whenever there is nobody else eligible to run this thread will be invoked.
trap_init() [/arch/i386/kernel/traps.c.]
Trap_init() initializes some of the processor’s interrupt handling capability. In particular, it aims the
processors interrupt vector table pointer to the address of the actual vector table, if necessary. Interrupts
are not enabled until later on, just before the calibrate_delay() function is run.

init_IRQ() [/kernel/i8259.c].
Init_IRQ() initializes the hardware-specific side of the kernel’s interrupt subsystem. Interrupt
controllers are initialized here, but their input lines are not enabled until drivers and kernel modules call
request_irq().
pidhash_init();
init_timers()
softirq_init() [/kernel/softirq.c.]
Softirq_init() initializes the kernel’s softirq subsystem. Softirqs are managed by the kernel’s ksoftirqd thread.
time_init() [arch/i386/kernel/time.c]
The time_init() function initializes the host’s system tick timer hardware. It installs the timer’s interrupt handler, and configures the timer to produce a periodic tick. The tick interrupt handler is usually called do_timer_interrupt().
console_init() [drivers/char/tty_io.c.]
The console_init() function performs early initialization of the kernel’s serial console device, if one is configured for use. This console device is used to display kernel boot messages before the formal, complete virtual console system is initialized. Once some basic TTY information is recorded, console_init() calls a host-specific console initialization functions.
kmem_cache_init() [/mm/slab.c.]
Kmem_cache_init()initializes the kernel’s SLAB memory management subsystem. SLABs are used for dynamic memory management of internal kernel structures.
calibrate_delay() [init/main.c.]
The calibrate_delay() function performs the kernel’s infamous BogoMips(tm) calculation. A
BogoMip is a unitless number that calibrates Linux’s internal delay loops, so that delays run at roughly
the same rate on processors of different speeds.The BogoMips calculation depends on the value of jiffies, the number of timer ticks since system startup. If the system tick is not working, the BogoMips calculation will freeze.
mem_init() [arch/i386/mm/init.c]
Mem_init() initializes the kernel’s memory management subsystem. It also prints a tabulation of all
available memory and the memory occupied by the kernel.
kmem_cache_sizes_init() [mm/slab.c.]
The kmem_cache_sizes_init() function finishes the SLAB subsystem initialization started by
kmem_cache_init().
fork_init() [kernel/fork.c.]
Fork_init() initializes the kernel’s max_threads and init_task variables. This information is used by the kernel during fork() system calls.
proc_caches_init() [kernel/fork.c.]
Proc_caches_init() initializes the SLAB caches used by the kernel. This is analogous to initializing
malloc()-style heaps in a user program.
vfs_caches_init() [fs/dcache.c.]
Vfs_caches_init() initializes the SLAB caches used by the kernel’s Virtual File System subsystem.
buffer_init() [fs/buffer.c.]
Buffer_init() initializes the kernel’s buffer cache hash table. The buffer cache holds blocks of
adjacent disk data, and is used to improve the performance of reads and writes to hard disks and other
slow media.
page_cache_init() [mm/filemap.c.]
Page_cache_init() initializes the kernel’s page cache subsystem. Page caches hold streams of file
data, and help improve performance when reading and writing user files.
signals_init() [kernel/signal.c.]
Signals_init() initializes the kernel’s signal queue. Signals are a form of interprocess
communication.
proc_root_init() [fs/proc/root.c.]
Proc_root_init() initializes Linux’s /proc filesystem, and creates several standard entries like
/proc/bus and /proc/driver.
ipc_init() [/ipc/util.c.]
Ipc_int() initializes the resources that implement SystemV-style interprocess communication,
including semaphores (initialized in the subfunction sem_init()), messages (msg_init()) and shared
memory (shm_init()).
check_bugs() [/include/asm-i386/bugs.h]
The check_bugs() function is where host-specific code can check for known processor errata, and implement workarounds if possible. Some implementations of this function check for FPU bugs,
opcodes that are not supported by the whole processor family, and buggy opcodes. Check_bugs() also usually calls identify_cpu(), to detect which version of a processor family is in use. For example, the x86 kernel’s identify_cpu() can identify and apply runtime fixes for Coppermine, Celeron, and Pentium Pro/II/III processors, as well as chips from non-Intel vendors like AMD and Transmeta.
smp_init() [init/main.c.]
If the host machine is an SMP-capable x86 processor, smp_init() calls IO_APIC_init_uniprocessor() to set up the processor’s APIC peripheral. For other processor
families, smp_init() is defined as a do-nothing.
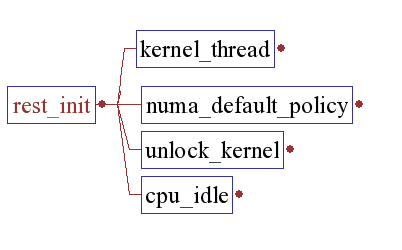
rest_init() [/init/main.c.]
rest_init()spawns a kernel thread init(),which later on execs the init process, & unlocks the kernel. Remember we have already set our selves as idle thread, now is the time to run the idle loop that is just to consume the CPU when no one else is eligible to run. We try to conserve power while we are in this thread. But if a power management routine is not available we settle down on a simple HLT.
[/init/main.c.]

init
Init() completes the kernel’s boot process by calling do_basic_setup().scheduling is enabled, the standard input, output and error streams are created, and prepare_namespace() is called to mount the root filesystem.
With the root filesystem in place, init() calls free_initmem to the free the memory used by the initcalls. Then opens /dev/console runs execve() to launch the program /sbin/init, if it exists. If a valid program name is provided with the init= programname command line option,
init() will execve() that program instead. If a suitable startup program cannot be found (the kernel also tries “/bin/init” and “/bin/sh”),If unable to exec the kernel panics and halts.
Free_initrd_mem();
Frees the memory used by the initrd image,after is is extracted & converted to a ramdisk.
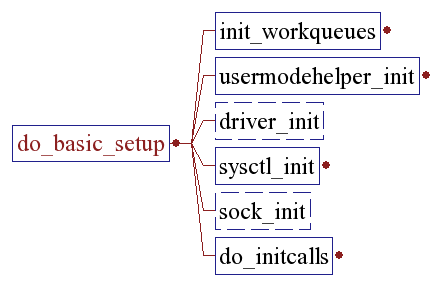
do_basic_setup()
The machine is now initialized. None of the devices have been touched yet, but the CPU subsystem is up and running, and memory and process management works .Now we can start initializing some other stuff.
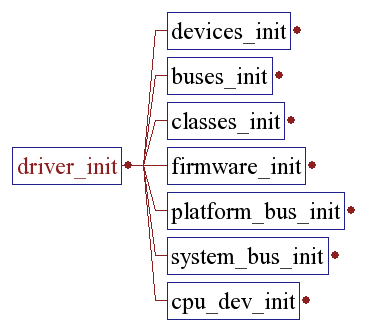
Driver_init()
Initializes the driver model by registering all the subsystems.
do_initcalls() [/init/main.c.]
Do_initcalls() runs the list of functions registered with the __initcall attribute, which usually only applies to compiled-in kernel modules and device drivers. The __initcall attribute eliminates the need for a hand-maintained list of device driver initialization functions.
The __initcall mechanism works by creating a constant function pointer in a memory section called .initcall.init, that points to the initialization function itself. When the kernel image is linked, the linker organizes all of these function pointers into a single memory section, and do_initcalls() invokes them in the order they appear there. At the end of this function it calls “flush_scheduled_work” just to make sure there is no pending stuff from the initcall sequence, because we will soon be freeing the initmem.
The kernel has currently 3 ways to mount the root filesystem:
a)All required device and filesystem drivers compiled into the kernel.In this case we don’t nedd an initrd image. Init() will call prepare_namespace() to mount the final root filesystem, based on the root= option and optional init= to run some other init binary .
b)Some device and filesystem drivers built as modules and stored in an initrd. The initrd must contain a binary ‘/linuxrc’ which is supposed to load these driver modules. It is also possible to mount the final root filesystem via linuxrc and use the pivot_root syscall. The initrd is mounted and executed via prepare_namespace().
c)Using initramfs. The call to prepare_namespace() must be skipped. This means that a binary must do all the work. Said binary can be stored into initramfs either via modifying usr/gen_init_cpio.c or via the new initrd format, a cpio archive. It must be called “/init”. This binary is responsible to do all the things prepare_namespace() would do.
To remain backwards compatibility, the /init binary will only run if it
comes via an initramfs cpio archive. If this is not the case, init() will run prepare_namespace() to mount the final root and exec one of the predefined init binaries.
When using initrd, the system typically boots as follows:
1)the boot loader loads the kernel and the initial RAM disk
2)the kernel converts initrd into a “normal” RAM disk and frees the memory used by initrd
3)initrd is mounted read-write as root
4) /linuxrc is executed (this can be any valid executable, including shell scripts; it is run with uid 0 and can do basically everything
init can do)
5)linuxrc mounts the “real” root file system
6)linuxrc places the root file system at the root directory using the pivot_root system call
7)the usual boot sequence (e.g. invocation of /sbin/init) is performed on the root file system
8)the initrd file system is removed
prepare_namespace()
mount_root() [/fs/super.c.]
Mount_root() tries to mount the root filesystem. The identity of the root filesystem is provided as a kernel option during boot, which in workstation environments is typically the hard disk device and partition containing the system’s root directory. Linux can mount root filesystems from hard disks, floppies, and over a network NFS connection to another machine. Linux can also use a ramdisk as a root filesystem. Mount_root() will try one or more of these sources before giving up and causing a kernel panic.
Now we have completed the initial boot up, and we’re essentially up and running. So we’ll get rid of the initmem segments and start the user-mode stuff. set the system state to SYSTEM_RUNNING. Open the initial console “/dev/console”
Now is the time to start the init process. We will try different binaries like “/sbin/init”, ”/bin/init” , “/etc/init/” or “/bin/sh”. If nothing is found we give up saying
“No init found. Try passing init= option to kernel.”.
/sbin/init
The program /sbin/init is the parent of all user processes, process with the PID as 1. Init’s job is to create other user processes by following the instructions found in the file /etc/inittab. Technically, the kernel itself has completely booted before init runs— it has to, since init is a user process. Despite this, most consider init to be “part of the boot process”.
A typical entry in the inittab file looks like “si::bootwait:/etc/init.d/boot”.The significance of each files in this entry.
id unique identity for that entry
rstate run level in which the entry will be processed
action tells init how to treat the process specifically
process what process will be started
actions
At any given time on a Linux system, certain base sets of processes are running. This state of the machine is called its Runlevel, and it is denoted with a number from 0 through 6. The system spends most of its time in a single runlevel. However, when you shut the machine down, init switches to a different runlevel in order to terminate the system services in an orderly fashion and to tell the kernel to stop.
The different runlevels are
0 > This level is used for halting the system. The only valid service for this level is the script halt, which is linked into /etc/init.d/rc0.d/. The script halt executes /etc/init.d/halt.local. special system issues for halt or reboot should be added there.
6 > This level is used for rebooting the system. The only valid service for this level is the script reboot, which is linked into /etc/init.d/rc6.d/. The script reboot executes /etc/init.d/halt.local. Specials system issues for halt or reboot should be added there.
S > This mode is used to switch from boot phase into single user mode. The last valid service for this mode is the script single, which is linked into /etc/init.d/rcS.d/. In this mode you have only one console.
1 > Accordingly to the Linux Standard Base (LSB) specification this runlevel is used to switch from normal runlevel into single user mode. This is different from former SuSE Linux versions!
2 > The run level 2 is without remote networking. Note that on some other systems this is identical with the single user mode. This run level can have more than one virtual console.
3 > The run level 3 is with network. This run level is for server stations not automatically running X.
5 > The level 5 is with network and xdm(1). You should have a configured and perfectly running X Window System for this work station run level.
4 > The run level 4 is not used.You can configure it your own way & get a customized reunlevel .
SuSe 9 conforms to the Linux Standard Base (LSB) for the whole initialization phase: the usual /etc/inittab defines what to execute at the different run-levels of the system, in /etc/init.d are stored all the startup and shutdown scripts for the various services, which are managed by the symlinks in the /etc/rc.d/rc.runlevel directories.
An useful sample file for building own startup scripts is /etc/init.d/skeleton which provides all the references and a base structure for a fully integrated script.Most of the startup options can be set editing the files in /etc/sysconfig .Some scripts are always executed at the startup (except when operating in emergency mode), before entering any runlevel:
/etc/init.d/boot
the first script which is started from inittab .
Within the inittab, there is a line for every run level that starts the script /etc/rc.d/rc, passing the run level as an argument . The /etc/rc.d/rc script, after a little housekeeping, then starts the scripts for that run level. For each run level, there is a directory underneath /etc/rc.d, such as rc3.d, which contains the scripts that will be run for that run level.
In single user mode, /sbin/sulogin is invoked. When entering single user mode, init initializes the consoles stty settings to sane values.
For multi-user modes depending upon the runlevel a “getty “ is spawned which will give you the login prompt. [3:2345:respawn:/sbin/mingetty tty3.]
Conclusion
We have seen the journey of a linux system right from power on to your login prompt.
This document has tried to throw some light on each every step that followed in the whole process. Mainly the Linux kernel source [2.6.9] was used for the investigation.
Still there are some topics, which were not dealt in details; the forthcoming versions of this document would surely be aimed at a through analysis of those.
Credits: I have used a couple of images (first few) from another document about the linux boot process,
Hope this will help.
Bhaskar Chowdhury
Could anyone explain to me why it is important that the BIOS assigns IRQs and initializes devices (apart from the Hard Disk, Keyboard, Screen) if Linux takes over when it boots up? Does Linux not take control of the IRQ range when it boots? (I know certain other OS's do) and does the BIOS have to do so much anymore?
ReplyDeleteI have a question for you: I want to setup a diskless client which will boot from a usb key but with nfs root filesystem located on a server which is not always on (it is a media server which switches on/off by itself). So my problem is: sometimes when the server is off my client need to wake it up, using WOL, so I though this could be done using initrd and linuxrc.
ReplyDeleteDo you know of any examples like that?
TIA
@Anonymous
ReplyDeleteYou might look into this information located here:
http://drbl.sourceforge.net/
This is a wonderful presentation of gritty details that remains readable to someone who is technical but who might lack bit-level or OS-code-level experience. Bravo!!
ReplyDeleteIf there were a continuation link, I would expect two more parts (1) /sbin/init following System-V script implementation, and (2) /sbin/init following Upstart implementation. The SysVinit has been nicely detailed by several authors. If someone would cover Upstart as thoroughly as your tretise covered kernel setup we would then have THE definitive references on cold-metal startup.
Nice Job
~~~ 0;-Dan
@saint-grillongroup
ReplyDeleteThanks for the appreciation and visit. I haven't had explored "upstart" properly yet and still investigating the matter about it. Once I get hold on that matter would surely express my view regarding that.
Cheers!
wow... i never came across such a detailed boot process explanation... cheers...
ReplyDeleteExcellent post.very clear and well prepared booting process....can u explain device drivers concepts in linux?
ReplyDeleteWonderful Post with complete Information, Googled many ways to find your blog. Happy that my required info. has one stop blog solution. :-)
ReplyDeletePlease do post Linux topics more.
I am really impressed with your blog article, such great & useful knowledge you mentioned here.
ReplyDeleteYour post is very informative. I have read all your posts and all are very informative. Thanks for sharing and keep it up like this.
Hospitality Solutions Provider
nice informative post. Thanks you for sharing.
ReplyDeleteSoftware Development
Wordpress Development